Sendmail 하기 전 DNS부터 하세요. Start with DNS before Sendmail.
↓↓↓↓↓
Sendmail Install
yum -y install sendmail
yum -y install sendmail-cf
yum -y install telnet*
yum -y install caching-nameserver
yum -y install dovecot
Sendmail 파일 수정 Modify Sendmail File
vi /etc/mail/sendmail.mc
dnl 제거 및 addr 수정
52번째 줄 ( 줄 다를 수 있으니 같은 내용을 수정하세요. )
Line 52 (The line may be different, so correct the same content.)
↓↓↓↓↓
118번째 줄 ( 줄 다를 수 있으니 같은 내용을 수정하세요. )
Line 118 (The line may be different, so correct the same content.)
↓↓↓↓↓
Sendmail 서비스 재시작 Service Sendmail Restart
Sendmail 환경 복사 Copy The Sendmail Environment
m4 /etc/mail/sendmail.mc > /etc/mail/sendmail.cf
M4 명령어를 이용하여 sendmail.mc에 구축한 환경을 sendmail.cf에 복사해 넣으세요.
이때 cp 명령어를 안쓰고 M4 명령어를 쓰고있습니다.
이유는 cp 명령어는 평문으로 되어있을 경우만 copy가 가능한데
m4 명령어는 해시함수가 포함된 쓰기방지인 것도 copy가 가능하기 때문에
M4 명령어를 쓰고 있다.
Copy the environment built in sendmail.mc to sendmail.cf using the M4 command.
At this time, the cp command is not used and the M4 command is being used.
The reason is that the cp command can be copied only if it is in plain text.
Since the m4 command can copy even write-protected hash functions
I am writing the M4 command.
Sendmail.cf 파일 수정 Modify Sendmail.cf File
vi /etc/mail/sendmail.cf
89번 줄 도메인명 변경 Line 89 Change the domain name
91번 줄 현재 작업 디렉토리 확인 Line 91 check the current working directory
95번 줄 주석 제거 Line 95 Uncomment
↓↓↓↓↓
121번 줄 RELAY 허용설정 Line 121 set to allow RELAY
149번 줄 에러 메세지 전송자 이름 Line 149 error message sender name
238번 줄 파일 설정 정보 Line 235 file configuration information
$j : 도메인 이름 $j: domain name
$v, $Z : sendmail 버전 $v, $Z: sendmail version
$b : 접속시간 $b: connection time
$w : 도메인 상세정보 $w: Domain details
336번 줄 메일 재발송 기간 설정
Line 336 Set mail resending period
341번 줄 오류 시 경고 메세지 전송시간 설정
Line 341 Setting the sending time of warning message in case of error
394번 줄 자동 중지 ( 주석 제거 ) Line 394 Auto stop ( Uncomment )
↓↓↓↓↓
mail 접속 IP 설정 Mail connection IP setting
vi /etc/mail/access
/etc/mail/access 에서 IP 별로 메일 발신을 제한 한다는 것이다.
아래처럼 localhost RELAY 를 입력하면 localhost는 허용하겠다는 형식이다.
그러므로 본인 리눅스 주소를 허용하게 만들어 주기 위해서는
사이트와 Connect옆 본인 리눅스 주소와 서브넷 마스크를 허용하게 만들어주세요.
In /etc/mail/access, mail sending is restricted by IP.
If you enter localhost RELAY as shown below, localhost is allowed.
So, in order to allow your own Linux address
Make sure to allow your own Linux address and subnet mask next to the site and Connect.
↓↓↓↓↓
설정이 끝난 후 Hash로 입력된 값을 풀어주는 역할을 해주세요.
After setting, please play the role of unlocking the value entered as Hash.
방화벽 설정 Firewall settings
#local 밑 localhost를 relay
Relay localhost under #local
vi /etc/mail/local-host-names포트 23번과 25번을 추가하고 방화벽 포트를 열어줍니다.
Add ports 23 and 25 and open firewall ports.
vi/etc/sysconfig/iptables백업 Back up
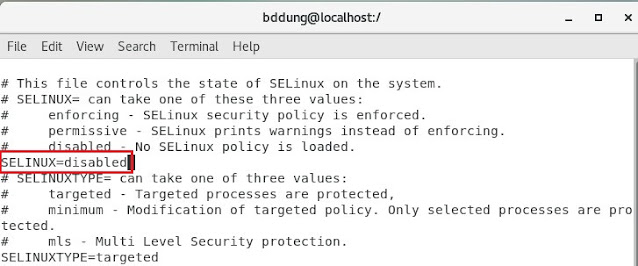
selinux 보안 정책 및 25포트 확인
Check selinux security policy and port 25
방화벽을 내리고 재부팅 한 후 비활성이 유지되도록 하고 SELINUX를 비활성화한다.
After turning down the firewall and rebooting, make it inactive and disable SELINUX.
vi /etc/selinux/config↓↓↓↓↓
Sendmail이 작동하는지 확인 Make sure Sendmail is working
Netstat를 이용해서 port 25번 확인 Check port 25 using netstat
ps -ef | grep sendmail
netstat -nl 25
Reboot 했을 때도 활성화 유지
user 생성 User Creation
실행 Execution
MAIL FROM : 보내는 사람
RCPT TO : 받는 사람
DATA : 내용
. : 메일 보내기( 도메인을 읽기 위해서 )
MAIL FROM: Sender
RCPT TO: To
DATA: Content
. : Send mail (to read domain)


댓글
댓글 쓰기